The fiber optic FPV remote controller transmits via optical signals, breaking through the bandwidth and anti-interference limitations of traditional radio frequency, and is reshaping the flight control experience. For beginners, transitioning smoothly from radio frequency to fiber optic involves selecting the right equipment, configuring it properly, and gradually improving the control accuracy in controllable scenarios.
Recommended Equipment List
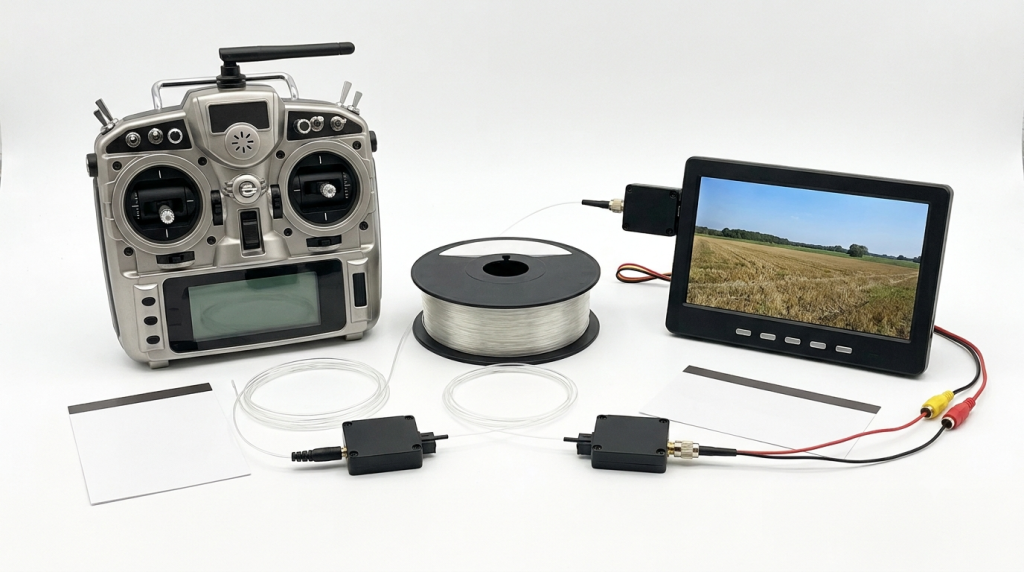
Remote Controller Body: A basic-level transmitter that is compatible with fiber optic modules (such as models compatible with FlySky or FrSky), with reserved module interfaces and a rear screen.
Fiber Optic Transmitter Module: An entry-level module supporting SFP+ interface (moderate power, integrated optical modulation circuit), facilitating later upgrades.
Optical Receiver Module: For airborne reception and signal demodulation, matching the wavelength and modulation method of the transmitting module.
Auxiliary Radio Frequency Channel: 2.4GHz/5.8GHz backup module, automatically taking over in case of optical signal interruption.
Power Supply and Cables: Low-voltage lithium polymer battery (2S/3S), high-quality wiring harness, ensuring stable power supply and low noise.
Configuration Process
Hardware Connection and Channel Mapping: Insert the fiber optic transmitter module into the remote controller module slot, connect the power and data lines according to the manufacturer’s pin definitions; complete channel mapping and centering calibration in the remote controller menu.
Frequency/Power and Coding Settings: Select the working frequency and power according to regulations and flight environment, set the control protocol and coding, and enable channel redundancy.
Receiving End Configuration: Correctly connect the airborne optical receiver module, bind it, and configure the output mode (PWM/SBUS/IBUS, etc.) and out-of-control protection.
Security Backup Verification: Test the optical signal quality and RSSI on the ground; simulate optical path obstruction to verify whether the radio frequency backup takeover is seamless. Usage Suggestions
Scene and Distance: Start on an open field, gradually increasing the distance from close to far, avoiding conducting long-distance initial flights directly in strong electromagnetic or complex light environments.
Practice before Flying: Familiarize with the simulator’s feel, establish a sense of body memory for the time delay of the optical signal; in the early stage, have a skilled pilot accompany the flight.
Equipment Inspection: Before each flight, check the cleanliness of the fiber optic end face, battery status, and firmware version; during the flight, pay attention to RSSI and alerts, and return to the base or switch to the radio frequency channel in time.
Gradual Improvement
Adjust PID and Curves: Based on the aircraft model and feel, make minor adjustments to the ratio and index curves; if there is a significant delay perception, you can optimize the PID parameters specifically.
Upgrade Lenses and Screens: Replace with higher-resolution FPV glasses or display systems, and adjust the optical path and display parameters to enhance immersion and visual clarity.
Recommendations for Purchase and Practical Operation
Brand and Service: Prioritize choosing manufacturers with good reputation, complete documentation and timely firmware updates, so as to obtain better after-sales support.。
Local Regulations: Comply with local frequency bands, power, and flight altitude restrictions to operate within a compliant area.
Select the Right Equipment, Follow the Process, Start from the Easy to the Difficult, and Progress Gradually. Novices can successfully complete the advancement from radio frequency to fiber optic, experiencing lower latency and stronger anti-interference capabilities that bring more control fun.